
Are you looking to save time in the kitchen while still cooking delicious and nutritious meals? Look no further than the Power Pressure Cooker XL. This multifunctional appliance is designed to simplify your cooking process and create flavorful meals in a fraction of the time.
As a kitchen lover, I’ve had the opportunity to work with the Power Pressure Cooker XL extensively and today, I’m going to share with you how to use this amazing appliance to its full potential.
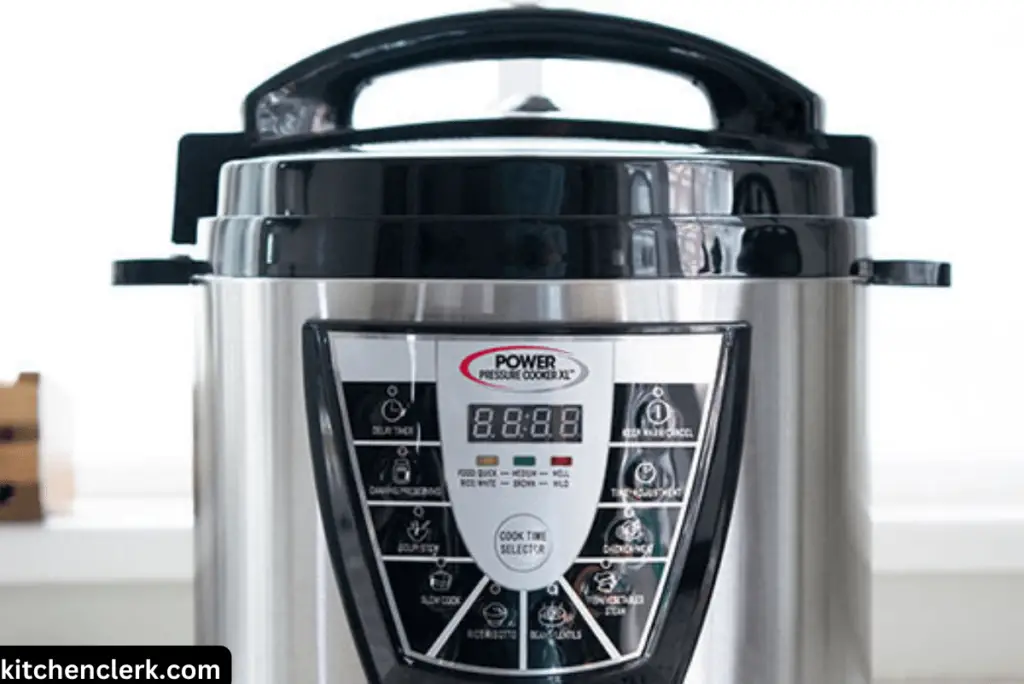
The Basics of the Power Pressure Cooker XL
This pressure cooker comes with a removable inner pot, a lid with a sealing ring, a control panel, and various cooking settings. The sealing ring helps to create a tight seal during cooking, allowing the pressure to build up inside the cooker.
To start using the Power Pressure Cooker XL, make sure the inner pot is clean and properly inserted into the cooker. The lid should also be securely in place with the sealing ring properly positioned. The control panel is where you’ll find the cooking settings and timers to customize your recipes.
How to Cook with the Power Pressure Cooker XL
Step 1: Add ingredients and liquid
The first step in using the Power Pressure Cooker XL is to add your ingredients and liquid. Since pressure cooking requires moisture to create steam, it’s essential to include enough liquid in your recipe. The general rule of thumb is to add at least 1 cup of liquid to the cooker, such as water, broth, or cooking liquid.
Step 2: Select the cooking function
Once your ingredients and liquid are in the cooker, it’s time to select the appropriate cooking function. The Power Pressure Cooker XL offers a variety of preset functions, including Rice/Risotto, Soup/Stew, Meat/Chicken, Beans/Lentils, Fish/Vegetables, Canning, and more. Each function is designed to provide the ideal cooking time and pressure level for different types of recipes.
To select the desired cooking function, press the corresponding control panel button. The digital display will indicate your selection, and you can adjust the cooking time using the “+” and “-” buttons if needed. It’s important to note that the exact cooking time may vary depending on the recipe and the quantity of ingredients.
Step 3: Start the cooking process
After selecting the cooking function and setting the desired cooking time, it’s time to start the cooking process. Simply press the Start/Stop button on the control panel, and the Power Pressure Cooker XL will begin building up pressure. During this time, the digital display will show the preheating stage.
Once the desired pressure level is reached, the cooking time will begin to countdown on the display. At this point, the cooker is fully sealed, and the steam cannot escape. The pressure cooking process will continue until the set cooking time is complete.
Step 4: Natural release or quick release
After the cooking time is up, you have two options for releasing the pressure: natural release or quick release.
Natural release involves allowing the pressure to naturally dissipate over time, which can take anywhere from 10 to 30 minutes or more, depending on the recipe. This method is ideal for delicate foods that require a gentle cooking process.
If you’re short on time or want to stop the cooking process immediately, you can opt for the quick release method. To do this, carefully move the pressure release valve to the venting position using a long utensil or a kitchen towel to protect your hand from the steam.
The steam will quickly escape, and the pressure inside the cooker will rapidly decrease. It’s important to note that you should never try to force open the lid until all the pressure has been released.
Step 5: Open the lid and serve
Once the pressure has been fully released and the float valve has dropped, it’s safe to open the lid of the Power Pressure Cooker XL. Gently twist the lid counterclockwise and lift it away from the pot. Be cautious of any remaining steam, and use oven mitts or silicone grips to handle the hot inner pot.
Now, it’s time to enjoy your delicious meal. Serve your cooked dish directly from the inner pot or transfer it to serving plates or bowls.
The Power Pressure Cooker XL helps to lock in flavors and nutrients, resulting in tender meats, perfectly cooked grains, and flavorful stews.
How to Clean and Maintain Power Pressure Cooker XL
Proper cleaning and maintenance are essential to ensure the longevity and performance of your Power Pressure Cooker XL. After each use, make sure to unplug the cooker and let it cool down before cleaning.
The inner pot, sealing ring, and lid can be washed with warm, soapy water and a non-abrasive sponge or cloth. Avoid using harsh chemicals or abrasive scrubbers that can damage the non-stick coating.
The Power Pressure Cooker XL also has a removable condensation collector, which should be emptied and cleaned to prevent buildup. Additionally, it’s recommended to inspect the sealing ring regularly for any signs of wear or damage and replace it as needed to maintain an airtight seal.
Conclusion
The Power Pressure Cooker XL is truly a game-changer in the kitchen, allowing you to create mouth-watering meals with minimal effort. Whether you’re whipping up a quick weeknight dinner, tenderizing meats, or preparing large batches of soup or stew, this versatile appliance delivers consistent and flavorful results.
I hope this guide has provided you with the confidence to start using your Power Pressure Cooker XL and explore the endless possibilities it offers. If you have any questions or want to share your own experiences with the Power Pressure Cooker XL, feel free to leave a comment below.